Practice Makes Perfect- Making Fire

22 December 2017

My son and I are always testing ourselves, no matter what we do. We make everything we can into a learning experience, do our best to find better ways to do things, and to get better at what we do. It could be a physical test, by turning a 5 mile canyon walk into a 15 mile walk for example. Or a skills test- I might let Nicolai do the packing for a trip, have him navigate and route-find as we hike, or have him get our stove set up or fire made for the night’s dinner.  Making fire is a classic test for us, something we can never practice enough. We use many different methods- a single match, a lighter, a metal match (a rod composed of a metal alloy known as ferrocerium) and tinder, a metal match and magnesium shavings, or a bow and drill. We make it a point to practice all these techniques in varying temperatures, different levels of wind, with different moisture levels, and types of tinder and fuel, essentially training for any possible conditions that we can. This is the way we get better, and master our skills.

Much can be said about fire making techniques and tools- everyone has their favorite methods, and opinions of different methods, not to mention opinions of countless other variables- how many methods you should carry with you, whether or not to carry natural tinder or a commercial variety, a small lighter or a large one, a book of matches or strike anywhere stick matches.  These are all questions that each person has to work out for themselves. No matter how many books you read, how many blogs you visit, or how many Youtube videos you watch,  it all boils down to your skill and comfort levels.  If you can make fire in a few seconds with your eyes closed by rubbing two sticks together, you probably don’t need to carry 3 or 4 different methods with you.  If you have trouble lighting a fire with matches, you should probably have a large, well-stocked fire kit with plenty of redundancy.

fire making methods- bow and drill, metal match, magnesium block. Photo by Gerald Trainor.

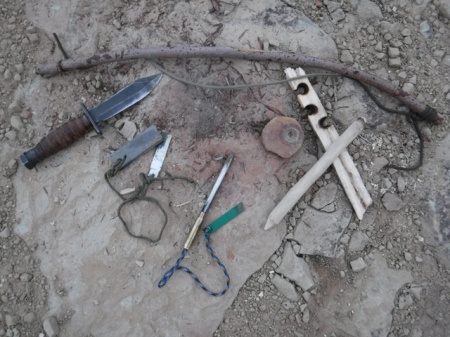
Three fire making methods- bow and drill, metal match, and magnesium block with imbedded ferro rod. No matter what your favorite method, it is important to become proficient. Being skilled in many fire making methods just adds insurance.

Start With the Basics
Fire making, like any skill, begins with practice. Depending on the method or methods you choose, it could be lots of practice. The key is to learn the skill before you need it- practice and become proficient with with the basics first- starting with matches or a lighter, then moving on to the metal match, the fire steel, bow and drill, hand drill, or fire plow. Did I mention you need to practice fire making? And if you decide to carry and use one of the “primitive” methods at the end of the preceding list, you need to practice even more- don’t wait until your life depends on it and assume you can work out how to use a fire steel, flint and charcloth. It may be too late.

Start with considering the placement of your fire- think about where you want to build it. Ask yourself if this is the right place for it now, overnight, and tomorrow. Think about wind and weather, what is overhead (remember the lessons of Jack London!), and if this is where you want to sleep if it is for the night. Consider reflectors, natural and those you put in place. Are there rocks or a rock face to direct the warmth towards you? Finally consider safety, dry grasses and branches for example and Leave No Trace principles.  Try not to build a raging, night-long fire where its existence will be visible for years.

No matter which method you use to get that all-important spark, all fire-starting methods require a tinder bundle for your spark, kindling to build it up, and fuel to feed the fire. Spending the time to create the perfect tinder bundle will insure success. Collecting and preparing kindling and a sufficient pile of fuel for your fire may mean the difference between being warm, and starting over.

Birds nest of juniper bark, photo by Gerald Trainor

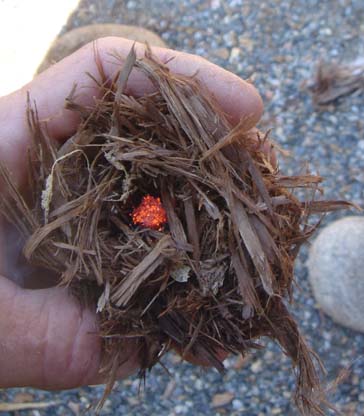
The perfect birds nest with glowing spark from a bow and drill.

Where we operate in the Four Corners region bark from the Juniper is the best tinder available. It is easy to find and remove from any Juniper we  come across. Our second choice is the hairlike, inner material from dry cottonwood bark. Chunks of dry cottonwood bark are usually found at the base of larger cottonwood trees; look for those that have large, dead branches. Either material should be twisted in the hands, or pounded between a couple of rocks to break it up and create the fine powder that is so easy to ignite. Of course there are countless other materials that can be used for a tinder bundle. The idea is to find something that can be reduced to fibers, and pounded nearly into powder. Other desert plants to look at include sagebrush, rabbitbrush, and some grasses if they are fine and very dry. After making your tinder bundle, simply hold your match or lighter underneath, place the spark from your bow and drill or charcloth into the bundle, or direct the sparks from your metal match into the bundle. Once you’ve reached this point the rest is fairly easy- slowly and carefully feed the fire with tinder, kindling and then larger fuel until it reaches sufficient size for your needs.

For more on fire making in general, see our Learning the Basic of Fire page.  Also see our page on the Metal Match and Magnesium Fire Starter. Visit the Desert Explorer website to peruse other skills topics as well as the highlights of some of our adventures.


The Utah Desert in November and Tracking Books

28 October 2013

As a person who actually enjoys 100 degree days, I tend to visit the Utah desert mostly in summer. But Nicolai and I are ready to try something new- we are planning a trip to Utah in early November, something I haven’t done in a long time. The days will be shorter, and the nights colder. But the stars will still be in the sky, tracks will still be on the ground, and the canyons will still be waiting for us. And to paraphrase that rather common fishing bumper sticker, “any day exploring the desert is better than a day….” You can fill the rest in.

An interesting petroglyph along the San Juan River. I have adjusted the contrast a bit to make it clearer. The actual patina is much lighter.

An interesting petroglyph along the San Juan River. I have adjusted the contrast a bit to make it clearer. The actual patina is much lighter and the glyph is covered by a light coating of sand carried by water running down the wall from high above.

Our plan is to head over the mountains on about the 7th of November and spend 10 or 12 days exploring. We will start in the Bluff area and continue walking the canyons of Comb Ridge, and investigating some of the new canyons we “discovered” on a recent trip. On the edge of one of those canyons we found a tremendous flake scatter, along with some incredible potsherds in many different styles. This will be our starting point for our exploration, with the goal of finding out if there are any other occupation areas in the canyon. If the weather allows we may do an overnight or two in the canyon. Otherwise there will be lots of day hikes and plenty of fires at the truck. We had hoped to fit in a visit to Kayenta, and then Navajo National Monument with a hike out to Keet Seel. But the park closes for hiking from early September through late May. So we’ll save that hike for next summer. Read more about Navajo National Monument, their season, and hiking there on the NPS website.

Beautiful potsherds at a site we have recently "discovered". The styles there were incredibly diverse.

Beautiful potsherds at a site we have recently “discovered”. The styles there were incredibly diverse.

I am also looking forward to finding some tracks- any tracks- and following them. Tracking is something that I find relaxing, challenging, soothing, and exciting at the same time. It is a primal urge that still lives in all of us, and for me it is important to let it out. And as I have noted in many past blogs, I feel it is an incredibly important skill for Nicolai to learn, for many reasons. We will take along a few of our tracking guides to study, being sure to re-read parts of them before we start out. Since we don’t have a teacher or mentor and are primarily using books to learn from,  it is important for us to revisit them as often as possible to make sure we haven’t forgotten too much. We have posted a list of all the tracking books we have in our library on the Desert Explorer website Tracking Pages, and continue to add to it as we find more titles.

A tracking book that we hope to add to the list soon, one I have been trying to find for years is The Art of Tracking: The Origin of Science by Louis Liebenberg. The link takes you to a free download of the book, which will be available in print in the very near future, by the end of October 2013 according to various internet sources. I will be ordering a printed copy if the rumor is true. Be sure to click through to the home page if you visit Liebenberg’s website- the site is quite interesting and there is a lot to it.

Anyone wishing to can follow our trip at our website, DesertExplorer.us– see the Twitter posts at the bottom of the page. These are automated and posted as we check in with our SPOT Messenger. We usually do a check in each night at camp, and also when we find a ruin or rock art panel.


More Tracking Books, Michael Yon Online, and Primitive Technology

6 December 2012

It has been two full moons now since I last left Utah. It is nearing the time of year when I start dreaming of returning, when I start really planning for next year. It is also the time of year when I re-read all of Tony Hillerman’s Jim Chee and Joe Leaphorn stories. It helps bring me closer to the desert I am so fond of. Those stories also get my mind thinking about tracking- if you aren’t familiar with Hillerman’s writing, tracking plays a part in every story. Jim Chee was an especially good tracker.

Besides Hillerman’s stories, I have recently re-read Theodora Kroeber’s Ishi In Two Worlds. Kroeber’s writing is scientifically interesting and informative, as well as entertaining. The book is not necessarily a book about tracking, but it is definitely a book that addresses what I call “wilderness mind”, or being tuned in, a necessary part of tracking. For Ishi, “the last wild Indian in North America”, what I call “wilderness mind” was just everyday life. Ishi’s life was unique, living as he did on the cusp of “the old way” and modern America. Reading about “the old way” can help anyone interested in tracking develop a better understanding for the attitude that native people lived in, being one with nature, and how they were in a state of awareness, naturally, that few will likely ever achieve in this modern age.

Another book I recently read is Freddy Osuna’s Index Tracking. Osuna, a Yaqui Indian, was a Marine sniper and tracker, and taught tracking to the military. His book is a very clear, quick read, outlining tracking in general including basic terms and concepts as well as his own adaptations to the ancient art. While there are references to hunting and tracking animals, the book is written with a human quarry in mind. The book is full of clear, well-captioned photos and leaves one with a good sense of what tracking is, and a yearning to delve further into it.

My final book reference is one that is highly recommended. Tom Brown’s Case Files of The Tracker is both thought-provoking and at the same time a bit disturbing. In this book Brown outlines what he feels are some of his great mistakes, and at the same time he really brings home what tracking is about to him. The endings to many of the stories are far from what he hoped they would be, and definitely not what I as a reader had hoped would happen. But there are lessons to be learned in every experience- that is what Tom Brown is telling us here, along with the countless other lessons on every page of the book. Again, in this modern age, few will ever achieve what someone such as Tom Brown has, and after reading some of his accounts, we might be thankful for this fact.

Michael Yon Online
Michael Yon is writer, photographer, journalist, and tracker. He is also and old friend from a “past life”. He is rather outspoken in nearly every field he writes about, often criticised, always critical and straightforward in his research and writing. The field he is currently writing about that I want to highlight is that of tracking. He has recently begun a series of articles about tracking and its application for soldiers in combat. Whether or not you care to read about Afghanistan, no matter what side you might take in the issue, the fact that tracking has very practical applications in the modern world cannot be denied. In his first few dispatches on the subject, Michael gives clear and concise examples of the importance of tracking for combat soldiers. Please take a look at his latest articles at his website.

Print from a Bates desert boot, size 10, in a canyon bottom about 28 hours old.

Print from a Bates desert boot, size 10, in a canyon bottom about 28 hours old.

Primitive Technology
I have mentioned the Society of Primitive Technology many times in my blogs, as well as praising their journal The Bulletin of Primitive Technology.  I am going to introduce them one more time. I learned about The Bulletin and the Society about 20 years ago as a student of anthropology, and found it to be one of the best real-world resources out there. In terms of experimental archaeology, that is, physically learning the skills that are studied and conjectured from the archaeological record, The Bulletin is invaluable. If you have even the slightest interest in primitive technology, then I recommend visiting their website and considering joining up.

The Bulletin comes out twice a year and its cost is included in membership, which is minimal and affordable at only 30 dollars a year. One look at the journal and you will be convinced it is worth every penny of membership.  The Bulletin is a full-color, magazine-style publication with articles that run the gamut of simple, clear and informative, to being so detailed and scientific that you will need to do research in order to  fully understand the concepts. And this is the beauty of The Bulletin- you can learn to make a functional scraper from a piece of quartzite and hammer stone after a couple of pages of reading, or you can learn the mechanics of flintknapping in all its intricacies, the qualities of materials, the benefits of heat treating  raw materials at various temperatures, and be on your way to making eccentric lithics like those made by the ancient Maya.

I would also like to mention that I have heard that the printed Bulletin may be going away. Costs are always rising for printing and distribution. And my guess is that memberships have lapsed over the last few years of lean economic times. To let this valuable resource go away would be a shame. Please take a look and consider a membership.

For more on tracking, primitive skills, and our desert adventures visit the Desert Explorer website.


Back From the Bush, Planning the Next Trip

31 March 2010

It is the time of year when I wish I could just stay over in Utah.  The winter is nearing its end and we are ready to get out. And two weeks is just never enough time, no matter the time of year. Nicolai and I had a great trip though, as always.  The weather cooperated for the most part.  There were a few cold nights, a few cold mornings, and of course the usual strong winds.  Precipitation was very limited- we had a couple of snow flurries that lasted all of an hour at the most, and a couple of light rains that passed in a few hours.

We started our trip as we usually do at our “secret” camp site overlooking the train tracks near Westwater.  From there we made a counter-clockwise loop to Moab, Green River, through the Green River Desert (along the edge of the Green River) to Horseshoe Canyon, Hanksville, down towards Hite, Cedar Mesa, and Mexican Hat, then up through Blanding and Moab back to I-70.

Horseshoe Canyon
We visited some new locations, including Horseshoe Canyon to look at rock art. The panels down there are just amazing, truly some of the best you will ever see.  And the preservation, for the most part, is great.  Nicolai was a bit confused about why there was a chain keeping us back from the rock art at the Great Gallery.  He understands that some people deface the rock art with their graffiti; he is quick to pick it out on nearly any panel.  When I explained that the idea is to protect the panels so that he can come back to see them in 50 years, he kind of felt okay about it.  We sat at the Great Gallery for a couple of hours, taking in the paintings, the clear sky, the trickle of water flowing down Barrier Creek.  We will undoubtedly return there.

The "Holy Ghost" panel, Great Gallery

"Shepherds dancing", great Gallery. Note the animated figures with staffs in the lower left.

Mexican Hat
On many of our journeys to southeast Utah we stop in at the San Juan Inn in Mexican Hat for breakfast. We have  a campsite at the southern end of Cedar Mesa that we frequently stay at, and that puts us only about 1/2 hour away from breakfast at the Olde Bridge Grille.  One of the people working in the dining room is Navajo artist Joey Allen.  We saw some of his prints last year and had hoped to buy one from him this time. Unfortunately he didn’t have any along, but they can be purchased from his website.

Hunting and Primitive Skills
Anyone who has read our blog or visited the Desert Explorer website knows that we focus a lot of our time on primitive skills.  On this trip we experimented with using rice grass for making the birdsnest for starting fires. We used it on many nights with the metal match, and gave it a try a couple of times with the spark from our bow and drill.  It required a bit more striking with the metal match to warm the material up than does Juniper bark for example.  I am sure this is because the material is more coarse.  The grass burst into flames with a couple of blows after dropping the spark from the bow and drill into the birdsnest.

Our fire kit with ricegrass birdsnest flaming.

In our last post we included a photo of a not-so-perfect obsidian knife we had made.  The inspiration for that knife is at the Edge of Cedars Museum in Blanding.  There are four beautiful knives on display there from a cache in nearby Westwater Canyon. They are normally displayed in the “visible storage” area upstairs.  But now they are downstairs in a plexiglass cube as part of a new exhibit, allowing me to get a decent photo of them.

Three of the four hafted knives on display at the Edge of Cedars Museum in Blanding.

Nicolai loves the knives and  we had to go back for a second visit to look at them, and take a few more photos for him, before we could leave Blanding.

We had originally planned to shoot a rabbit or two on this trip.  Nicolai had plans for the meat, as well as the pelts and other parts. But we did not have the best luck hunting during the time we had our license.  We did find tracks and scat, nothing fresh, but no rabbits made themselves visible to us. We did have some fun firing our Ruger 10/22 though.  It was Nicolai’s first time firing it and he loved it.  It seems it will be a permanent part of the packing list for Utah from now on. And we’ll try our luck at finding some rabbits next trip.

He's a pretty good shot, with a little help.

SPOT GPS Messenger
Finally, we did try out our new SPOT.  We sent at least one “okay” message from our camp each night. We sent out our custom message whenever we found rock art or ruins.  I made note of where and when each message was sent. Every message made it through, without fail.  You can click on the links that are sent out and view “road” maps, toppgraphic maps, or satellite maps. From our end on the ground, it took only seconds for the “message sent” light to start blinking.  I was a little skeptical about that, so took notes on each “send”.  I am more of a believer now.  It is a great way to keep in touch and let friends and family know you are on track and okay.  And should you need it, it might save your life. You can read more about the SPOT and how it compares to PLB’s in some of our past blog posts or at the Desert Explorer website.

Our SPOT GPS Messenger connecting with GPS satellites for location information before sending our custom "found rock art" message.

This  post has provided a quick summary of some of our trip. We will post more in-depth soon about the rock art we saw and other locations we visited that might be of interest  to everyone.


Planning For the Next Utah Trip- Hiking, Hafting, and Hunting

23 January 2010

Normally this time of year finds me working away  at reviewing the past season, posting blogs, photos, info, and adding new web pages to the Desert Explorer website. The cold of the winter usually keeps me indoors, and thus affords the time for writing and planning for the coming summer. But this winter proves to be quite busy- with the holidays, new business ventures, and a notebook full of things to do, my time has been taken up elsewhere. My apologies to those looking for new info from Desert Explorer.

The Next Trip
Nicolai and I had planned to take a trip to Utah before Christmas, focusing on Horseshoe Canyon and a few other points of interest around Hanksville. But the cold put us off. My five-year old is quite tough, but the constant low temperatures and snow forecast for the area made both of us think twice about 8 or 10 days out in the bush at this time of year. At this point we have re-scheduled our trip for mid-March, once the temperatures start to rise and the days are longer.  We are both really looking forward to the trip as we always are; Nicolai now brings up ‘going to Utah’ as much as I do.

As for our itinerary, we  are planning a couple of hikes in Horseshoe Canyon, with an overnight up a side canyon (camping is not allowed in the Horseshoe Canyon unit of Canyonlands). We are also planning a recon of trailheads and entrances into a couple of canyons in the San Rafael Swell and a look at the river for a future float, some hiking in Robbers Roost Canyon,  a day or two of canyoneering in North Wash, and some time looking at the geology of the region.

The area around Hanksville has some very interesting geologic features. First there is the Factory Butte area with its mesas of Mancos shale capped with sandstone.  Near Factory Butte, on the road to Hanksville, you can see fossilised oysters in the exposed Mancos shale and Dakota sandstone. There is Goblin Valley to the north- Entrada sandstone eroded into animal, human, and various other sculpted forms.  There are the igneous lacoliths that make up the Henry Mountains. And there is the Dirty Devil River canyon and its tributaries, starting in the Entrada formation and emerging at Hite in the Moenkopi formation. If you are interested in the geology of the region, one of our favorite books  is Halka Chronic’s Roadside Geology of Utah.

Rabbit Hunting and Primitive Weapons
Nicolai is very excited about the prospect of hunting rabbits on this trip. He has been practicing his tracking and stalking techniques on the countless squirrels, and the few cottontails, that inhabit our neighborhood. He has been talking about shooting a rabbit and eating it for months now. He plans to eat all the meat, the marrow (which he already does with chicken bones), keep some of the bones for tools, and keep the hide to make a bag for his tools. I am not averse to killing and eating a rabbit, although I can honestly say I haven’t done it in many years. I am not sure if we will use our primitive weapons for the task (I am not even sure it is allowed in Utah). Most likely we’ll take a long a rifle. Either way I think it is an important task for him, something I remember doing when I was his age. It will help further his understanding of the power of a rifle and its uses, the concept that we use all we can of an animal if we kill it, and even death itself and our responsibility  for the life of an animal. I think these are all concepts that are overlooked by most people, and are too far from the lives of most children these days where meat comes from the supermarket.

We have finally finished hafting an obsidian blade on a handle and a point on an arrow shaft.  I collected chunks of hardened pine pitch recently on a couple of mountain runs, and we melted it down in a can in our fire pit. We then painted the sinew holding the point and blade with the liquid pitch and dusted it with clean, dry, white ash from the fire. The white ash causes a  reaction when it contacts the warm pitch and creates an epoxy-like bond. Whether or not we use the tools on our trip, Nicolai now has them in his tool kit.

For more information on primitive weapons and skills, Utah trip guides, and desert hiking and backpacking, visit the Desert Explorer website.


Tracking- Getting Started, Guidebooks

12 May 2009

I have been tracking in some form as long as I can remember. As a kid I would find a track, or what I thought was a track, and follow it.  I remember searching for and finding sign of different animals- birds, muskrat, rabbit, beaver- from a very young age. I never had any sort of formal instruction and did not know that there were any formal terms or techniques for tracking until after I had done it for many years. Not that my tracking followed any form of technical or traditional tracking lines of thought, or so it seemed- I went out, found tracks, and followed them.  I used common sense- moved quietly, slowly, moved around tracks, observed them from high and low and made it a point to try and think like the animal I followed. After reading a number of tracking guides I found that these are the basics to tracking.  And again I was reminded that our  nature as creatures of the wilderness has not been lost to the modern world.  If you let yourself go with it, it will come back to you.

Tracking With My Son

Since my early endeavors at tracking I have read a few of Tom Brown’s guides including his Field Guide to Nature Observation and Tracking and his book The Tracker. I have picked up bits of tracking skill over the years from other books such as texts about the Kung of the Kalahari desert, Tony Hillerman’s Jim Chee novels (it’s true- Chee can teach you something), and from locals during my travels in the jungles of Mexico and Belize. In recent years I have given much more thought, time and effort to my tracking endeavors.  Much of this has to do with tracking with my son and teaching him the skills. Tracking is an important part of his wilderness education and is something I am now “formally” teaching him.

Nicolai on his way to visit our local coyote friends.

Nicolai on his way to visit our local coyote friends.

Tracking is another great way for us to spend calm, quiet time together as we hone our powers of observation and enjoy being outside. We are lucky in that we have access to a few square miles of old ranch land close by which has become a sanctuary for wildlife escaping the encroaching subdivisions. We visit the place often observing coyote, fox, prairie dog, rabbit, and red tail, Swainson’s and marsh hawks, to give a short list. My son really loves the aspect of stealth- we walk slowly and quietly together, without talking, and when we get close enough, we change from tracking posture to stalking posture, crawling along the ground and observing from behind cover. We have even developed our own hand and arm signals for communication.  My goal is to make tracking second nature, whether we are walking across the grass at the park or up a remote desert canyon in Utah.

Tracking Humans

In a recent post I mentioned an old friend of mine who was attending the British Army Tracking School in Brunei. You can read his informative posts at MichaelYon-online. Since reading his near daily posts from the school, I have become motivated once again to move forward with tracking skills. I have done some research on tracking, tracking schools, and books on the subject.  Much of what I found had to do with military and law enforcement tracking, and many of the guides were written with tracking mainly humans in mind.  However, I personally recommend both of the Tom Brown books noted above as a place to start.  They are simple and clear with story lines that develop as they entertain and inspire.  They introduce you to basic animal tracks as you read along and treat tracking as an almost spiritual undertaking. When you reach the end of them you will have a thorough understanding of basic animals tracks, tracking techniques and of the “tracking mind”.

cat_skull

One of the benefits of tracking- adding to the collection of skulls and bones. Nicolai holds the skull and mandible of a house cat he found along our track. It's likely that it had been a meal at some point for the coyotes we were tracking.

Another recommended title, which has just come out in a revised edition, is Bob Carss’  SAS Guide to Tracking.  Carss was an SAS soldier for 20 years and taught at their tracking schools. His book starts by giving definitions and explanations and is aimed not only at soldiers, but at teachers and parents- he wrote it as a guide to help teach tracking to his son. The book is much more technical in its layout than Tom Brown’s guides, and has chapters on finding lost tracks, types of sign, aging of sign, stalking, and observation.  You cannot come away from this book without learning at least the basics, even if you do not do any of the exercises or drills that Carss provides. This book has become our textbook for the formal study of tracking.

These volumes together are very complementary, covering human and other mammal tracking, and the technical, military side of tracking as well as the spiritual side.  They both stress the same points for the beginner who wants to explore tracking, such as lots of practice, moving slowly and quietly, observation, study, and thinking like your quarry. Both volumes also discuss the need to let go of the modern world and move into the tracking mind to be a competent tracker.  Tom Brown explains it as developing a “deeper awareness”, making the process a sort of meditation, which is reason enough to read his work.


Wilderness Kids- Survival Skills for the Four Year Old

24 April 2009

When we go hiking my son carries his own Camelbak with water, snacks, his bird guide and a few survival items including a whistle and a flashlight.  I have stressed to him since the very beginning the importance of being prepared, of having all he might need with him, just in case. As a father I feel one of the most important things that I can do for my son is to teach him the skills to stay alive in the bush. Of course our frequent practice of primitive skills goes far beyond the average person’s idea of being prepared, and of being self-sufficient. For the average hiker these skills are not entirely necessary, to say nothing of the average four or five year old. But it is very important that they know what to do if they become separated from you on a hike.

A note on terminology- I avoid using the term “lost”.  “Misoriented” is a term used in the U.S. Army roughly translating to being lost.  The philosophy is that you never really become “lost”- you are somewhere on your mapsheet and the mission depends on your continuing. “Misoriented” in this context is always proceeded by the term “temporarily”.  There are psychological advantages to never allowing yourself to become “lost”, but rather “temporarily misoriented”, and to teaching this perspective to your child. With that said, I personally have never been lost in my life, and never will be. I stress this point to my son as well.

The Basics of Hiking Together

The following discussion assumes that you are teaching your child wilderness skills as you hike, discussing topics such as trees, plants, rocks, animals, and even the weather.  It is assumed that you are carrying a map and compass, and that you are actively teaching your child about them, allowing him or her to use them as you hike.  Teaching children about nature in general and about maps, about how to find north with or without a compass, and about basic navigation techniques empowers them and will help them develop a healthy relationship with the wilderness. For more on teaching children wilderness skills, see our Wilderness Kids pages.  For more on land navigation see the Maps and Navigation pages at the Desert Explorer website.

The first thing to teach your young one before you ever take your first hike together is to stay close, at least in sight distance.  Children are naturally and healthily attached to their parents- they want to be near us.  They stay close to us at the grocery store, and keep us in sight at the park for example. Hiking in the bush should be no different.  Talk to your children about the potential dangers where you are hiking- this might be a stream, animals, steep slopes, or thick brush where you could be quickly separated.  Explain to them that you are not in your back yard, that they need to stay close, closer than normal- stress the importance, but do not scare them with it.  You want them to enjoy the wilderness, not to fear it.

Each situation will be different, but if my son and I are following a discernible trail, I often let him take the lead. I then have him in sight all the time. If I lead I am constantly turning to check on him.  We often hold hands and walk together on our hikes, taking in the sights and discussing everything we see.

If We Become Separated

Should we ever become separated my son knows what to do.  I have taught him that if he cannot see me, cannot hear me, if I do not answer when he calls for me, that he should find shade and sit down. I have taught him to be calm, have a drink of water and continue to listen and call for me.  In his pack he carries a very loud survival whistle.  He knows that this is not a toy- it is to be used only in such a situation. That is his next step; get out the whistle and blow it at intervals.  This whistle is so loud that there is little chance of me not hearing it.

My procedure is the same if we become separated- I stop and call for him, listen for him, and wait for the whistle. With him stopping in place and sitting down, I am given the advantage of being able to easily follow my backtrail and locate him.  He knows that if he stops and sits down he is making it easier for me to track him.  If I cannot find him on the backtrail, I can find where he wandered off our trail and begin tracking him to where he sits.

Thoughts on Being “Lost”- Panic or Calm?

Panic is the primary danger to people who become misoriented in the bush. Once a person realises they have lost control of their situation, that is, they are lost, a downward spiral can quickly occur.  Stories abound of hikers hundreds of feet from the trail, or a mile from a road, heading off in absolutely the wrong direction, thrashing through the brush, leaving their gear behind, exhausting themselves, and putting themselves in extreme danger.

The thought behind stopping immediately could have saved many hikers from uncomfortable and unplanned nights in the bush, and worse.  When people are lost, out of panic, they often begin to travel aimlessly-  to wander, to cross their paths again and again, or to travel in circles looking for the lost trail or a recognisable feature.  For rescue personnel who might be tracking them this makes the job all the more difficult.

The first thing to remember if you do “become lost” is to remain calm. Sit down, take a drink of water, and relax a moment.  Then consider where you have come from and where you are heading.  If you calmly and logically assess the situation, chances are you will quickly realise where you went wrong.  If you are indeed unable to find your way back, you must remain calm and gain control of the situation. For more information on how to address being lost, and a survival situation in general, see the Survival Kit pages and the Primitive Skills pages at the Desert Explorer website.


The Four Year Old Flintknapper- More Thoughts on Teaching Children Primitive Skills

18 April 2009

This post is a follow-up- or perhaps a continuation- of the post titled The Four Year Old Archaeologist. In this post I discuss how I have been teaching my son about lithic technology- stone tools- and how to make his own. For more on teaching primitive skills to young children, see the Wilderness Kids pages on the Desert Explorer website. Also see our Primitive Skills pages for explanations and introductions to some of the skills.

My son Nicolai and I make it a point to practice some form of primitive skills at least once a week.   We build countless fires, have recently spent time tracking many coyotes, identify useful plants wherever we go, throw sticks and spears, and now have begun flintknapping together.

I introduced Nicolai to stone tools- ancient ones and those I had fashioned- when he was about two years old.  I showed him points, explained how they were made, and what they were used for.  On our frequent trips to the desert I would pick up any lithics I found- a scraper, part of a point, a core, and lots of debitage (the smaller pieces left behind during the tool making process)- and let him hold them.  We even visited and camped near a quarry sight where I explained the process of curation of raw material and how stone found in one location can be carried to other locations hundreds of miles away.  Finally,  I carefully explained the processes  involved in making each piece of debitage or stone tool he was holding, giving him an overview of the flintknapping process as follows.

The Process of Making a Tool

First you find a cobble- a suitable looking piece of the raw material.  You remove the cortex (the weathered exterior surface) from the cobble by striking it with another cobble called a hammerstone, of a different material.  The best hammerstones are river cobbles; elongated, rounded, with smooth surfaces.  You find an appropriate looking surface on the piece of raw material, called the platform, and strike away.  The idea is to remove long flakes from the core that can be used to make points, scrapers, blades, or numerous other stone tools using more refined techniques and other flintknapping tools such as a deer antler pressure flaker.

Beyond the technical description of how a tool was made, I include in my explanations things like why we found the piece where we did- deposited in the bed of a wash by moving water for example.  I also explain my thoughts on why the people who made the piece chose that location to use it- maybe they chose a wooded hillside that had a good view of a pocket of water below, and waited for deer to come and drink there.  I talk about why the toolmaker may have left the tool- it may have been stuck in a wounded animal that they could not catch that later died in the area.  Or it may have broken during use, striking a rock or the bone of a target, and was then discarded. If it was a flake tool or a scraper, it may have been more of an expedient tool, made, used and discarded in place.

Now when Nicolai finds a flake he tells me about it.  He can explain the flintknapping process, and has a solid grasp of how the various tools were used. Now we are beginning to discuss the process in more depth, differentiating between the different flake types- primary, secondary and tertiary flakes- and investigating the actual reduction process which takes place during tool manufacture.

Making Our Own Stone Tools

At home in our back yard primitive camp Nicolai has watched me work away at large pieces of obsidian, making smaller pieces with a hammerstone.  He has watched closely as I use antler billets and tines to make my blanks into usable tools- blades, scrapers and points.  Now he has begun making his own.

Nicolai arranging his core and getting ready to strike off a flake.

Nicolai arranging his core and getting ready to strike off a flake. He is very serious about the process. Note the safety glasses.

I know that he always pays very close attention when I explain or demonstrate something to him, and when I answer his questions. This is natural for children, and as old as the process of toolmaking itself- the child sitting with the parent or other elder learning the lifeways of his people.  From the very first time Nicolai picked up a core and hammerstone I could tell by his technique that he understood all I told him and had watched me carefully.  From the way he sits, how he looks for the proper platform, how he holds a core in a piece of leather tightly against his leg, to the way he holds and strikes with the hammerstone, he is on his way to becoming at least a functional flintknapper, if not one who shows skill beyond the average level. It may not be long before he is critiquing my stone tools and teaching me new techniques.

For more information on flintknapping and recommended titles on the process, visit the Lithic Technology page on the Desert Explorer website.


Dirty Devil River Float- Itinerary, Equipment, Logistics

26 April 2008

The time for the first trip of the summer is nearly here. I will float the Dirty Devil River from about 14 May till about 27 May, giving me roughly about two weeks on the river. The float is only about 80 miles and can be done in much less time; 8 to 10 days would be sufficient. But I have plans to explore at least 6 or 8 of the canyons draining into the river. I’ll do 4 or 5 dayhikes, maybe more, and at least 2 or 3 overnights in the longer canyons. I have been studying the maps, but haven’t really decided yet which to explore. I will most likely choose them at the last minute, when I am standing at the mouth of the canyon looking up into it. I am considering mostly those draining from the east for overnights: Robbers Roost Canyon, No Mans Canyon, Larry Canyon, Twin Corral Box Canyon, Sams Mesa Box Canyon and Happy Canyon. There are plenty of choices!

I will need at least 9- 1:24,000 mapsheets for the float and hiking, possibly as many as 12 depending on how far upcanyon I choose to go. I will start with the 9 mapsheets that cover the river- I am picking those up next week- and decide then if I need others.

I have begun packing for the trip. As I am going solo, there will be a good size pile of gear and food. I like to pack early, then re-pack about a week out, then do a final packing a day or two before heading out. This allows me to really see what I am thinking about bringing along, and gives me plenty of chances to leave gear behind that I won’t need as well as plenty of chances to make sure nothing is left behind. Since I am hiking and backpacking on this float trip, I will need to cater my packing list to cover all three activities. This leaves plenty of room for overpacking, not something I want to do on a shallow river such as the Dirty Devil. From all accounts I have found so far, there will be enough dragging of the boat across sandbars as it is, without adding un-needed weight to the boat.

I have tentatively scheduled a shuttle with Tag-A-Long Expeditions in Moab. the shuttle will cost 50 dollars. They will meet me at the takeout near Hite Marina on 14 May. I will leave my truck there and they will drop me at one of the two bridges where the Dirty Devil meets the highway near Hanksville. I have not decided yet if that will be west of Hanksville, or north. On my way to the takeout near Hite I will recon both possible put-ins and make that decision.

Besides exploring the river and hiking and backpacking up the side canyons, I will be on the lookout for ruins and rock art to photograph. I also plan, as usual, to work on my primitive skills. Although it will be early in the season, I will be searching for edible plants. I have a list of plant parts to try this year, including cattail pollen and the young, spring shoots.

Visit the Desert Explorer website for more details on this and other desert topics.


San Juan River, Primitive Fishing Skills, White Rim Trail Solo Ride

16 March 2008

San Juan River Launch Dates

The launch calendar for the San Juan River is online. The San Juan River referred to is the section found in southeastern Utah, with the put-in just outside the town of Bluff at Sand Island. We drew our launch for 22 July, with our take-out about 28 miles downriver at the town of Mexican Hat. Ours will be a family float this year, my wife, son and I taking about five days for this short stretch of river. The float can be expanded to nearly 84 miles to the “final” take-out at Clay Hills Crossing. Just below Clay Hills is a rather new and impassable waterfall blocking the way to the upper reaches of that “lake” below. A portage around the waterfall could add innumerable miles to ones itinerary; you could float all the way to Glen Canyon Dam.

Unfortunately for those who missed the lottery date, the Sand Island calendar is nearly full in May, June and July. March, September and October dates are nearly all open, April and August are about half-full. The mid-summer dates are full for launches from Mexican Hat as well, but outside of May, June and July there are more open dates if you are considering floating from Mexican Hat to Clay Hills only. Either way, if you are hoping to get on the river act quickly as every day more red rectangles appear in each month of the calendar, indicating full launch days. If you have a limited window for floating, do not despair. Check the launch calendar daily for cancellations. Updates are posted every weekday and you might get lucky and find the date you need open. For more information on floating the San Juan River visit the Desert Explorer San Juan River page.

Primitive Fishing Skills

Last week my son and I worked on primitive fishing implements. Using a deer leg bone, an old metapodial (the elongated toe bone in the hind leg) we created a couple of skewers, or gorge hooks. Gorge hooks are straight pieces of bone in this case, sharpened on both ends. they can be made from hardwood splinters as well. A leader is tied at the center of the piece. To bait them, the gorge is turned sideways, parallel to the leader, and the bait is slid over both. Once the gorge is swallowed by the fish, tugging releases it from the bait and allows it to turn sideways and lodge inside the fish.

The process began by crushing the bone with a hammerstone, with a concerted attempt to create long, thin splinters of bone. Once this was accomplished the chosen splinters were snapped to about 1 1/2 inches in length, close to the desired final length. Next the abrading process began. I used a slab of flat but rough sandstone to abrade and form the gorge. I held the bone between my thumb and forefinger, moving it back and forth, mostly on the long axis of the piece of bone. This helps to avoid flaking off larger pieces of bone and helps create a more symmetrical finished product. Each gorge pictured below took about 1/2 hour to create. For more on primitive fishing skills and survival fishing kits, visit the Desert Explorer Primitive Skills pages.

gorge hooks created from deer leg bone

White Rim Trail Solo Ride

I have begun working on my packing list for my unsupported White Rim ride. It will not be till August, but since I had some free time I started to compile my gear list for the trek. I will take five days to do the ride, averaging about 25 miles per day, with one day to sit by the river. I will be pulling a BOB trailer with all my gear behind me. The majority of my carried weight will be in water. I will not be able to resupply water until the end of day 3 when I camp at either Hardscrabble or Labyrinth campsite. Both are on the Green River and they are just a few miles apart. I will decide which I will use this week. I will be able to resupply on day 4 as well as that will be my free day at one of these river campsites. The final day will be the ride out.

I have not yet decided on which BOB trailer I will use. They have two single-wheel models, one with a shock and one without. They weigh 17 and 14.5 pounds respectively and both have a maximum load capacity of 70 pounds. I will make an attempt at keeping all my gear at 20 pounds or less; ultimately I would prefer it weighs in at 15 pounds. But with bike tools, shoes (other than my riding shoes), and 5 days of food, 20 pounds is more realistic. Add to that 1.5 gallons of water for days 1, 2 and 3, and 1.5 gallons as a buffer- 6 gallons total, and I have added 48 more pounds. This brings my total towed weight to about 85 pounds if I choose to tow the BOB Ibex model, with a load of about 68 pounds, just under the load limit.

I will continue to refine my list and eventually post the packing list on the Desert Explorer website as the ride draws nearer.