Tracking Exercise- Bears in a Utah Canyon

24 February 2018

By Nicolai Trainor

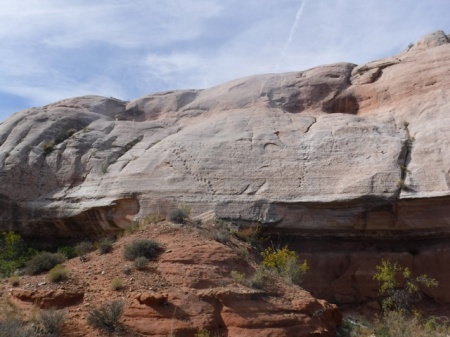
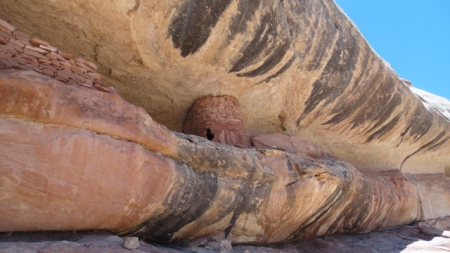
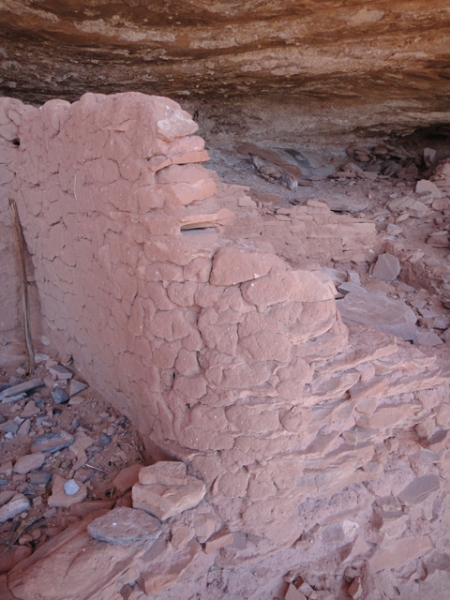
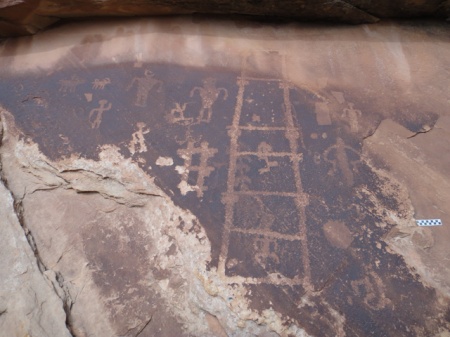
On our most recent trip to Utah we decided to hike a canyon close to one of our camps. We had been wanting to hike this particular canyon for a very long time, and what we found was a big surprise. After hiking for about forty five minutes, we stumbled upon what looked like human foot prints. At first they looked like tracks from someone wearing “barefoot shoes”, but after closer inspection we found that they were actually tracks belonging to a black bear. A little more hunting showed there was a definite bear trail. We decided to follow the tracks as we still had not found a way into the bottom of the canyon and were pretty certain they would lead us to a way in. Farther along the trail we found another set of tracks, these likely from the night before. From then on it was a goldmine of bear sign.

Bear sign in a Utah canyon. Photo by Nicolai Trainor.

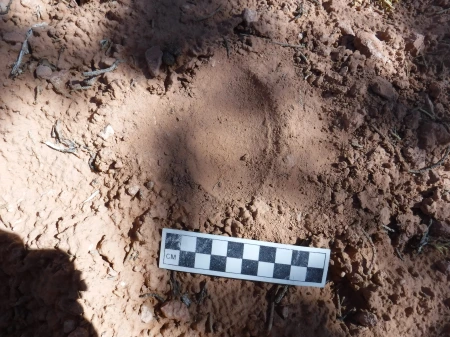
Black bear sign in a Utah canyon.

Once in the canyon we found scat, even more fresh tracks, and lots of feeding sign. One of the best things we found was a set of tracks that were from a mother and a cub. They had stepped into part of a little stream and when we found them the tops of the tracks had just started drying. We calculated they could not have been made any more than twenty minutes before we found them. Their tracks went further up the canyon, so we went down! Through out the day we saw many more tracks along with a wide variety of sign, but nothing newer then a few weeks. It appeared that the bears stayed mostly in the upper parts of the canyon and had not ventured very far in quite a while.

Perfect black bear track in canyon bottom mud. Photo by Nicolai Trainor.

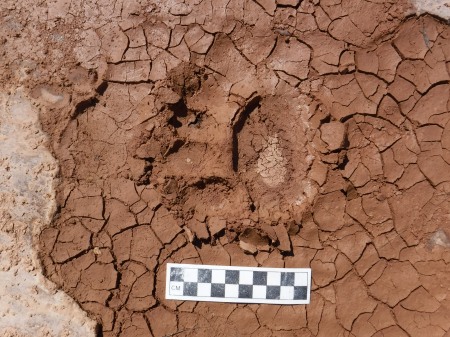
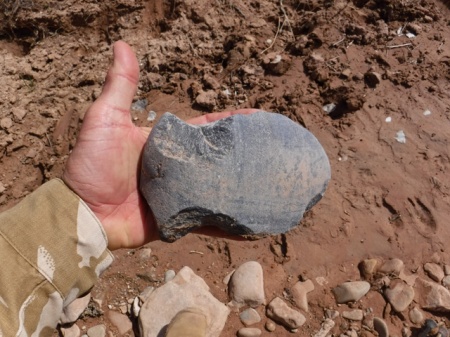
A perfect black bear track in quickly drying mud in the canyon bottom.

Identifying Bear Sign

One of the most helpful things for identifying bears are their tracks. Although similarities can be seen for both black and grizzly, both kinds of bears have different characteristics to look for when identifying their tracks. For instance black bear tracks are usually smaller but can be easily mistaken if they slide in mud or if the track is a double register (two tracks, one on top of another). Unlike black bears, grizzly bears are diggers so their claws, if present, can register up to an inch or more away from the toes. The tip of the claw can also be the only thing that registers so look far in front of the track. Another feature is that grizzly claws will show just on the surface whereas black bears are climbers, and their claws which are curved more drastically than grizzly’s will register deeply and relatively close to the toes. One more thing that I should mention that contributed to the identification is that Utah is not within grizzly bear range so when identifying the tracks we could immediately eliminate grizzlies from the list of possibilities. This is not the case for a lot of places though. In much of the northern United States, Canada, and Alaska the range of black and grizzly bears overlap making it potentially more difficult to identify the species.

Black bear tracks on canyon rim. Photo by Nicolai Trainor.

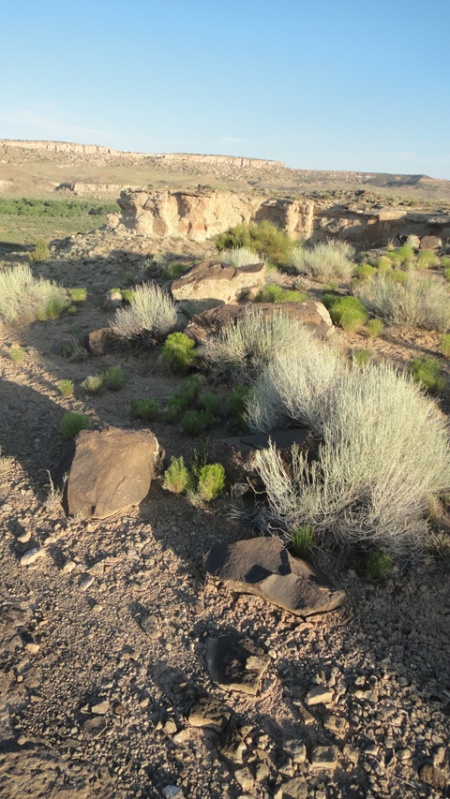
Don’t bust the crust! Good luck explaining that to a black bear. Tracks through crypto-crust heading into the canyon.

Black Bear Feeding Sign

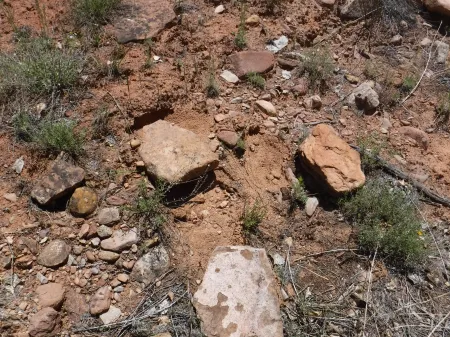
Blacks bears are always eating so it is not uncommon to come across places where a bear has eaten. Feeding sign can be anything from turned over rocks and logs to some berry bits laying on the ground. During our hike there was feeding sign all through the canyon. The area that we found the most sign was about half way down the canyon. We were walking through an area strewn with a mixture of small stones and boulders, and we stumbled upon an entire line of rocks 6 to 18 inches in diameter that had been shifted and turned over. Farther along there was a log that had been rolled over. Both these groups of sign are pretty common to find but also very distinctive of bears feeding. Often you will see a whole line of rocks that have been moved and shifted. The bear sticks its claws under the rocks and flips them over when looking for food.

Bear feeding sign, southern Utah canyon. Photo by Nicolai Trainor.

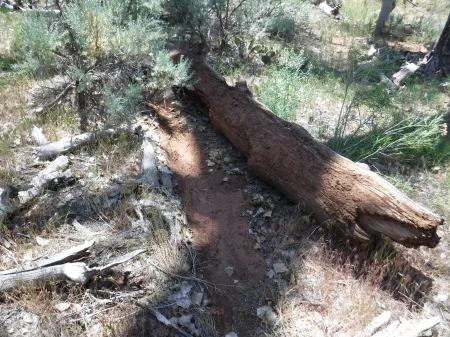
A rolled log in the canyon bottom, typical bear feeding sign.

DSCF1388

During our hike the freshest bear sign was concentrated mostly in the upper parts of the canyon. This is probably because there was more running water and thus more food. Another contributing factor to so much sign is that the canyon is rarely explored by humans. On the hike we found only one set of human tracks that were at least a couple of months old. All these factors contributed to the canyon being prime bear habitat.

Our hike start to finish ended up being about 10 miles, but it felt longer because of all the ups and downs and the time spent looking at bear sign. We ended up climbing out of the main canyon through a drainage that was actually a marsh. This added more time to our adventure and made it all the more interesting.

For more on our adventures, visit the Desert Explorer website. For more on tracking, see the Desert Explorer Tracking Pages.


Practice Makes Perfect- Making Fire

22 December 2017

My son and I are always testing ourselves, no matter what we do. We make everything we can into a learning experience, do our best to find better ways to do things, and to get better at what we do. It could be a physical test, by turning a 5 mile canyon walk into a 15 mile walk for example. Or a skills test- I might let Nicolai do the packing for a trip, have him navigate and route-find as we hike, or have him get our stove set up or fire made for the night’s dinner.  Making fire is a classic test for us, something we can never practice enough. We use many different methods- a single match, a lighter, a metal match (a rod composed of a metal alloy known as ferrocerium) and tinder, a metal match and magnesium shavings, or a bow and drill. We make it a point to practice all these techniques in varying temperatures, different levels of wind, with different moisture levels, and types of tinder and fuel, essentially training for any possible conditions that we can. This is the way we get better, and master our skills.

Much can be said about fire making techniques and tools- everyone has their favorite methods, and opinions of different methods, not to mention opinions of countless other variables- how many methods you should carry with you, whether or not to carry natural tinder or a commercial variety, a small lighter or a large one, a book of matches or strike anywhere stick matches.  These are all questions that each person has to work out for themselves. No matter how many books you read, how many blogs you visit, or how many Youtube videos you watch,  it all boils down to your skill and comfort levels.  If you can make fire in a few seconds with your eyes closed by rubbing two sticks together, you probably don’t need to carry 3 or 4 different methods with you.  If you have trouble lighting a fire with matches, you should probably have a large, well-stocked fire kit with plenty of redundancy.

fire making methods- bow and drill, metal match, magnesium block. Photo by Gerald Trainor.

Three fire making methods- bow and drill, metal match, and magnesium block with imbedded ferro rod. No matter what your favorite method, it is important to become proficient. Being skilled in many fire making methods just adds insurance.

Start With the Basics
Fire making, like any skill, begins with practice. Depending on the method or methods you choose, it could be lots of practice. The key is to learn the skill before you need it- practice and become proficient with with the basics first- starting with matches or a lighter, then moving on to the metal match, the fire steel, bow and drill, hand drill, or fire plow. Did I mention you need to practice fire making? And if you decide to carry and use one of the “primitive” methods at the end of the preceding list, you need to practice even more- don’t wait until your life depends on it and assume you can work out how to use a fire steel, flint and charcloth. It may be too late.

Start with considering the placement of your fire- think about where you want to build it. Ask yourself if this is the right place for it now, overnight, and tomorrow. Think about wind and weather, what is overhead (remember the lessons of Jack London!), and if this is where you want to sleep if it is for the night. Consider reflectors, natural and those you put in place. Are there rocks or a rock face to direct the warmth towards you? Finally consider safety, dry grasses and branches for example and Leave No Trace principles.  Try not to build a raging, night-long fire where its existence will be visible for years.

No matter which method you use to get that all-important spark, all fire-starting methods require a tinder bundle for your spark, kindling to build it up, and fuel to feed the fire. Spending the time to create the perfect tinder bundle will insure success. Collecting and preparing kindling and a sufficient pile of fuel for your fire may mean the difference between being warm, and starting over.

Birds nest of juniper bark, photo by Gerald Trainor

The perfect birds nest with glowing spark from a bow and drill.

Where we operate in the Four Corners region bark from the Juniper is the best tinder available. It is easy to find and remove from any Juniper we  come across. Our second choice is the hairlike, inner material from dry cottonwood bark. Chunks of dry cottonwood bark are usually found at the base of larger cottonwood trees; look for those that have large, dead branches. Either material should be twisted in the hands, or pounded between a couple of rocks to break it up and create the fine powder that is so easy to ignite. Of course there are countless other materials that can be used for a tinder bundle. The idea is to find something that can be reduced to fibers, and pounded nearly into powder. Other desert plants to look at include sagebrush, rabbitbrush, and some grasses if they are fine and very dry. After making your tinder bundle, simply hold your match or lighter underneath, place the spark from your bow and drill or charcloth into the bundle, or direct the sparks from your metal match into the bundle. Once you’ve reached this point the rest is fairly easy- slowly and carefully feed the fire with tinder, kindling and then larger fuel until it reaches sufficient size for your needs.

For more on fire making in general, see our Learning the Basic of Fire page.  Also see our page on the Metal Match and Magnesium Fire Starter. Visit the Desert Explorer website to peruse other skills topics as well as the highlights of some of our adventures.


On Adventure, Diet, Health, and Fitness

15 September 2017

I know this is a departure from my usual post topics of the desert, gear, trip reports, and archaeology. In a sense it is a belated follow-up to a post of a few years back about going gluten-free and making other changes to my diet.  As someone who has been going for my entire life, who never stops moving, as a runner, a hiker, biker, backpacker, and so on, my health and fitness define my life.  Diet is an inseparable part of that health, fitness, and lifestyle. And so, this post.

To recap what prompted some pretty drastic changes to my diet, a few years back I started experiencing allergic reactions to certain foods, or so it seemed. The reactions were in no way life threatening, but more of an annoyance. I decided immediately to make some changes- no more gluten, soy, peanuts or dairy other than occasional hard cheeses- more recently I have cut out grains and all added sugars as well.  Since then I have felt great- and often realised that I have never felt better!

But once again some of those reactions started to show up.   I visited my medical doctor who within seconds of my describing the symptoms was already talking about drugs and allergy tests. Since I went to her without any expectations of help, I left in the same mindset- that change was up to me. I immediately went back to doing more research and found that intestinal permeability was a very likely cause of the reactions. And probably had been all along.

Yes, it seems to be another “trendy” problem; intestinal permeability is up there with being gluten free, fermented vegetables, and paleo diets.  But there are times when trendy things make sense, when data support the trends we follow. All of a sudden, everywhere I looked, every book I picked up, every person I talked to told the same story. Intestinal problems seemed to be affecting everyone. I felt very disturbed at this development, both because it affected me, and because I found myself asking what kind of a world we’ve created where we readily accept and eat “food” that is toxic and is killing us! But the eternal skeptic in me understood that we live in a time of producers and consumers. We take what we are fed…at least until we can’t take it any more….

Back to diet and health. As the symptoms returned a book showed up at our house. My son read it first, and would not stop talking about it. It covered so many of his interests- World War II resistance fighters, guerilla warfare, Greek mythology, edible wild plants, diet, exercise, parkour, and natural movement. So I had to read it next. I was immediately so engulfed that I couldn’t put it down. Not only did it convey so many things I really needed to read about, it sent me off in other directions which were equally important to my current research. First published in 2015, Natural Born Heroes is written by Christopher McDougall. The book is centered in Crete during World War II, but it is so multi-dimensional, so full of adventure, and leads in so many other directions, that it will appeal to just about anyone. McDougall introduces the reader to the Cretan resistance during World War II, to the local sheep herders who became guerilla fighters when they needed to, to operatives from Churchill’s Ministry of Ungentlemanly Warfare, and to how they fought together and used the natural environment as part of their strategy to win.  So, how does this relate to my health?

Natural Born Heroes by Christopher McDougall

Natural Born Heroes by Christopher McDougall- another starting point for me in my quest for a healthy, active life.

The author, an athlete and ultra-runner, talks extensively about diet and how it relates to the ability to endure physically. He introduces the paleo diet, the Maffetone Method (more on that in the future), and sugar-free, meat and vegetable based eating. There are so many other topics he delves into- “health as heroism”, the importance of interaction with nature, the history of natural movement, diet and evolution, fat as fuel, the myths of cholesterol and carbo-loading, and the menace of sugar- that there is no way I could cover it all in a blog post. I suggest reading the book! It was another starting point for me, helping take my health to another level.

Next on the reading list is a book about autoimmune conditions. More fun reading, which I will write about soon. In the meantime I’ll be running every day and enjoying my health. For more on our adventures- most of which take places in the Utah  desert- visit the Desert Explorer website.


Alone in the Desert and Thoughts on Trip Planning

10 May 2017

I’ll begin with one of my favorite statements lately- there just isn’t enough time in the day to do it all. As luck would have it, I did find time to get out over spring break, and of course I have planned to write something about it. So here we go, to summarise: I managed 12 days of hiking and saw some amazing sights, as always. Weather was great, excepting the usual spring winds that always come up. There were birds- lots of raptors this trip, including many bald eagles. Reptiles were out- lizards of many types and one very cold rattlesnake that didn’t move throughout an entire day.  And the rock art- there were so many amazing panels and elements and discoveries within panels that it constitutes a blog in itself. But beyond all that, this trip was unique as it was my first spring break alone in about 10 years. My usual sidekick, my son, had too many prior engagements to come along. I made the most of my time alone, enjoying the Utah sunrises, sunsets, evening fires, and every minute in between.

Square spiral petroglyphs in southern Utah. Photo by Gerald Trainor.

A unique set of four square spiral petroglyphs. Do they represent the seasons? I would be curious to revisit this site during the seasonal changes to see if there are any types of solar alignments.

One thing that struck me this trip beyond all else was the amount of time we spend planning, and where that planning can sometimes get us. Don’t get me wrong- planning can be everything, it can mean the difference between a fun, memorable trip and a disaster. But there are times that planning can get in the way of our adventures. Planning can hold us back, it can hold back the explorer in us and stifle the sense of accomplishment, the sense of discovery that we seek out there in the bush.

We live in an overstimulated world with just too much information flowing around us, in our heads and readily at hand. One of the reasons I go into the desert is to escape all that. And I don’t want to bring along a bunch of data- on anything. I want to walk and see and hear things, feel the sand under my boots or under my bare feet, wonder about what is around the next corner.  I don’t want to look for the next thing I am supposed to find at a certain distance from a certain point. Where is the fun in that? For me, that is too much like everything else in life these days- click a link and it’s all there. That is decidedly not what wilderness is about for me.

white hand pictographs in San Juan county, Utah. Photo by Gerald Trainor.

White hands- one of my favorite pictographs, and one of the first I “discovered” in southeast Utah about 20 years ago. I visited them again on this trip.

I have never been one to plan an entire trip, hour by hour, water point to water point, camp site to camp site. I know that people do this. There are guide books that do it for you. This is one of the very reasons I don’t use guide books, other than for very general information. My favorite writer of guides, as I have expressed over the years, is Michael Kelsey. He gives clear, concise, to-the-point information, and not much more. That is all I want- mileage to the trailhead for example, if I don’t choose my own, or maybe data on the best way to climb out of a canyon that everyone says cannot be climbed out of. Kelsey’s books are the place for something like that. After that, it is all up to me.

Moving on from my philosophy of wilderness travel back to civilisation, I always end my trips in Moab. I like to mention my favorite local businesses, in support of the community there. Moab Gear Trader has recently moved into the space above their original store. They have so much used and new gear now that it’s easy to find something you can use. I have an account there, and usually drop gear to sell on every trip. You don’t have to live locally to do this- give them a call to see if they may want your used gear. And if you can’t find what you need there, just down the street is Gearheads, where you will find whatever it is you forgot to bring along. There was a time when I would worry about that piece of gear that I inadvertently left behind, but not any more. Between Moab Gear Trader and Gearheads, I know I will find what I need.

Axe head found in wash in southeast Utah. Photo by Gerald Trainor.

Found in a wash bottom- one large axe head. They artifact had signs that it had been in the wash for some time, and also plenty of use wear. It was made from a perfectly shaped, very flat river cobble.

Gear is good, but we can’t leave out food and coffee to make us happy. Moonflower Coop, on 100 North right off of Main Street, recently completed a major renovation and it is not to be missed. They even  have a seating area now at their deli, where they offer fresh salads, sandwiches, soups, and much more. They are right across the street from Moab Coffee Roasters, one of our favorites. Need a backup bike tube with your coffee? Be sure to visit Moab Classic Bikes on Center Street for both- yes, there is a coffee shop in the bike store. Very convenient!

Our next trip is planned for the end of May- a couple of weeks in the Hanksville area. We are planning, if weather and water levels permit, to walk the Dirty Devil River. No dragging the boat this year! In the meantime, there is plenty more information on desert travels in southern Utah at DesertExplorer.us.


End of Summer Reflection- Canyons, Rock Art, Backroads, and Walled Cities

21 November 2016

It seems that summer has finally ended. We had our first snow of the year in Boulder county last week, signaling the official end of warm weather. It is always a tough time of year when I change from shorts and Chacos into pants, boots, and jacket.  But it is also a time when I look back on the summer that has ended and reflect on all the new things I have seen and the adventures I have had. This year included more time at Nancy Patterson Village, lots of exploration in Montezuma Canyon, a couple of trips into Grand Gulch, and plenty of time in smaller canyons and on dirt roads across southern Utah. More exploration of Cottonwood Wash revealed many ruins, rock art panels, and a few sets of moki steps. One of my favorite “discoveries”, and it may be just that as I have been unable to find references to it, was a series of stone alignments pointing to Spirit Bird Cave. And as always, there was more climbing around in Comb Wash.

Besides indulging in the archaeology of Utah, we did a “side trip” this year and looked at some very different, and more extensive cultural history. Although it requires another post entirely, which may or may not happen, I’ll at least mention our few weeks in Europe in September, most of it in Croatia. In summary: Roman ruins, defensive positions from the time of the Romans, Venetians, Turks, World War II, and the Balkan war of the 1990’s. There was Split, Dubrovnik, Zagreb, and many cities in between, a week on the Adriatic Sea and visits to many islands including the Isle of Vis, which was a partisan stronghold during World War II and was covered with the history and archaeology of the period, not to mention its Cold War history.

Dubrovnik, Croatia- view from wall surrounding the city looking towards the Adriatic Sea.

Dubrovnik, Croatia. Far from southern Utah, but an archaeological and historical dream. This view of the city’s rooftops is from the wall surrounding the city looking towards the Adriatic Sea. Many of the roofs are new- a relative term in a city over 1000 years old- having been destroyed by shelling from the Yugoslav Army and Navy during the siege of the city in late 1991.

Stone Alignments
Back to Utah and its stone alignments. I do not recall having found anything quite like these stone alignments before, at least in this area of southern Utah. Of course that doesn’t mean they aren’t out there.  They reminded me of Mayan roads we often encountered while working in the jungles of Belize; wide, clear pathways with rocks piled along the margins leading off through the jungle. Inevitably the paths led directly to another ruin.  In this case, upon finding the first alignment, I suspected it had something to do with the nearby power lines and the access roads leading up to them. But then I found a corresponding alignment parallel to the first. To make it even more interesting, the next finger to the east had the same alignments, parallel to those on the first. And the third finger, still further east, had more aligned stones, albeit not as neatly done nor as complete as the first two sets. The first two sets had neatly cleared “alleyways” in between the stacked stones, where the stones were likely taken from.

Finally, standing in the center of the alignments looking west brought your eyes directly to Spirit Bird Cave on the rim across the canyon. Not a coincidence, to be sure. And not a “roadway” per se, but more of a ritual or spiritual roadway perhaps, if we accept the importance of Spirit Bird Cave within the context of the local ritual complex.

stone alignment near Sprit Bird Cave, southern Utah. Photo by Gerald Trainor

Stone alignment near Spirit Bird Cave, southern Utah. Spirit Bird is on the canyon rim off in the distance, directly in line with the stacked stones. Spirit Bird is slightly higher in elevation than the mesas the three alignments sit on.


Stone alignment near Nancy Patterson Village, southern Utah. Photo by Gerald trainor.

Same set of aligned stones, looking east toward the second finger of the mesa.


ritual pathways near Spirit Bird Cave, southern Utah. Photo by Gerald Trainor.

Alignment on the second finger, looking west towards the first finger and Spirit Bird Cave. The azimuth of the stones parallels those on the first finger and points directly to Spirit Bird Cave. This alignment had even larger stones than the alignments on the first finger, but not nearly as many stones in total.


Cottonwood Wash
Cottonwood Wash is an extensive drainage covering more than forty miles from the Abajo Mountains until it meets the San Juan River in Bluff. The drainage is rich in many ways- plants, animals, birds, geology, and of course archaeology. Like Comb Ridge, Cottonwood Wash is a favorite “standby” hike for us. During my October trip I hiked the wash a couple of days at a couple of different locations and as always found more than I bargained for. A number of ruins had the most perfectly faced cut stones I have seen in some time. Not only was the facing perfectly flat and smooth, all the exposed stones in the walls were on exactly the same plane. I expected to find the level and string used in building the walls among the pot sherds.

Moki steps, southeast Utah. Photo by Gerald Trainor.

An array of moki steps. For some reason the ancient inhabitants created many ways out of the canyon at this location.

I also happened upon a very large cave with semi-subterranean structures. Unfortunately many of the structures had been dug out by looters, leaving the walls exposed. The cave also contained an array of hand prints- mostly yellow and green, but plenty of red as well.

Yellow hand prints, southern utah. Photo by Gerald Trainor.

Some of the 200 hands in a large cave. Scale is 10 centimeters.


For more on our desert adventures, an introduction to the flora and fauna of Utah, and links to some of our favorite Utah-related books, visit the Desert Explorer website.


Urban Tracking Exercise

23 September 2016

On  a recent morning I took an early walk to our local coffee shop. After getting a cup of coffee, I continued on my walk to another destination a few blocks away. But as I rounded the first corner and was about to cross the street, I noticed a coin at my feet- a dime. I thought”I should pick that up”… and then I noticed another. Next thought, “I’ll pick up both f them.” But then I noticed something else shining out in the middle of the street. Scanning the area, I picked up 4 or 5 more shimmering coins in the early morning sun. I picked them all up and stood pondering some 55 cents in my hand and why the coins were there: there was a parking space nearby- perhaps someone getting out of a car dropped them? But they were scattered, too far from the parking space, out into both directions of traffic. My tracking exercise for the day had begun.

While nearly all of my tracking training takes place in the bush, and most of it in Utah, I will take any challenge I can get. Not only did a few coins on the ground offer me an opportunity to track, but it offered a mystery to ponder: why were coins scattered in the street? It didn’t make sense that they were dropped exiting a car; how did they get distributed as they did? And why did someone not pick them up after dropping them?

After pocketing the coins I walked off towards the west, down the middle of the street (I was still in a small parking lot), scanning carefully, looking for more “sign”. I quickly picked up more dimes, and a few nickles. Standing at an intersection in the parking lot, I had lost sight of sign ahead. West lead to an empty stretch of road for a while, then to another small strip mall. Instead I turned around toward the east and walked in the direction of many blocks of apartment buildings.

Urban tracking exercise- beggining of sign.

Apartment breezeway where sign trail began.

To shorten what could be a long and detailed story, I spent the next hour slowly walking down streets- usually close to the gutter and sidewalk, and with traffic for me, crossing the street a couple of times, down sidewalks, through apartment parking lots, through breezeways, and even through a play area and around an apartment’s pool area. By the time I arrived at the east end nearly an hour later I had two pockets full of change. This end- which was undoubtedly the beginning for the dropper-of-coins, was at a staircase in a breezeway leading to 4 upstairs apartments in one of the complexes. I confirmed the lack of further sign by casting out in all directions from my last definite sign, essentially doing a lost track drill from the base of the stairs, not once but twice. Not a coin was to be found. Next I backtracked, double-checking, finding a couple of missed coins, all the way to my western-most point. I cast out from there and found the trail once again. It only lead me a little further along the road just across from the strip mall, and essentially to the front of a small shop that sold cigarettes.

Urban tracking exercise- coffee money for the week.

The outcome of my exercise- about $20.38- coffee money for the week.

My conclusion about my exercise: a person had left their apartment building possibly in a time of limited light (the reason they may not have seen the dropping coins) and/or because they had ear buds in their ears and couldn’t hear the coins dropping. They either held the coins in a bag (a plastic shopping bag perhaps as they always come with a ready-to-tear seam in the bottom), or more likely in an unzipped pocket, or pocket with a small tear, of a backpack. They likely rode a bicycle (many were found locked at the bottom of the apartment stairs) towards the strip mall end-point. The bicycle theory is based on the winding trail of coins, the fact the more coins were found where the quarry rode off a sidewalk onto the street (the bounce forced more coins to fall), and the path staying on concrete or asphalt, and when in the street, close to the gutter and in the direction of traffic. There were plenty of places where a person walking would have cut across grass, or between parked cars for example, but a bike would go around which it clearly did.

All in all it was a great morning walk, and a welcome and unexpected chance to do some tracking. And in the end, with $20.38 in coins in my pockets, I was set for coffee for the rest of the week! For more on our tacking endeavors visit the Desert Explorer tracking pages and be sure to see our recommended books on tracking.


May and June in Southeast Utah- Nancy Patterson, Amtrak, and Grand Gulch

25 July 2016

We usually make a trip to southern Utah each year later in June, staying into July. This year we planned it so that trip was moved up to late May and into June. It made for more bearable and longer days at Nancy Patterson Village, and easier walking in the canyons later on. Of course there has been another trip since then where we enjoyed temperatures in the high 90’s and low 100’s.  We’ve had such a full summer so far there just hasn’t been time to get to a blog post until now.

Nancy Patterson Village
For the third season we spent a couple of weeks at Nancy Patterson Village doing archaeology. We finished the interior excavation of the room where we began in 2014. We have so much data at this point that it may take us into next summer just analysing and writing it all up. It was our assumption that our unit, being on the edge of the village, was late in date. We confirmed this, and we also confirmed our speculation that the room was built over an earlier midden. Our unit was in the eastern-most room of what I would call a patio group. The approximate size of the group is 13  by 13 meters. It is U-shaped, being open on the east side.

Collared lizards at Nancy Patterson Village. Photo by Gerald Trainor.

Working at Nancy Patterson Village would not be complete without our daily visits from collared lizards. Here a pair watches us from our backdirt pile.

Data collected from throughout the patio group indicate the earliest occupation is centered on the western side, or bottom of the “U”. The latest occupation appears to be our unit, the end room on the northern leg of the “U”. It is likely that the end room opposite us, to the south, is coeval with ours. There are other rooms and room blocks beyond our patio group out in the periphery; isolated rooms, those laid out in a linear fashion, and possibly an L-shaped group. These rooms are all unexcavated and the dates are unknown, but we assume they are closer to the date of our unit which was likely abandoned toward the “very end”, somewhere around the early to mid-1200’s. More about Nancy Patterson will be posted as we continue analysis and writing.

The young archaeologist at work. Nancy Patterson Village, Mesa Verde corrugated sherd being removed. Photo by Gerald Trainor.

The young archaeologist at work at Nancy Patterson Village with a large Mesa Verde corrugated sherd from a post-abandonment artifact concentration just removed.


Amtrak as Part of Our Adventures
After our time at Nancy Patterson Village we had a few relaxing days at a couple of our favorite camps before Nicolai headed home. For those unfamiliar with the area around Interstate 70 north of Moab, a rail line roughly parallels the highway from Glenwood Canyon in Colorado to just past Green River in Utah, where it turns north toward Salt Lake City. The line is used by freight trains and by Amtrak as well. Since we hadn’t been on the train in a number of years, we decided to use it to get Nicolai back to Colorado. We boarded in Green River at about 8 AM and arrived in Glenwood Springs about noon where we met the missing member of our party (mom gets to hold down the fort when we are off in the bush.) The train ride, if there are no long delays, is scenic and enjoyable. You get to see a lot of country along this four hour stretch, and it’s best seen from the observation car. Unfortunately the trip back to Green River was not as quick nor as enjoyable. Just outside Glenwood Springs the train hit a truck which delayed us for about 4 hours. Believe it or not, the driver of the truck crawled out and walked away. The conductors on the train called it miraculous, and likened the train hitting a truck to a semi truck running over an empty soda can. The lesson- be careful at all railroad crossings, especially those without arms that come down to block traffic.

Amtrak train at Green River station, Utah. Photo by Gerald Trainor.

Ready to board, green River station platform.

Grand Gulch
With Nicolai safely back in Colorado I had the next week or so to myself. So it was off to Grand Gulch for some alone time. I hadn’t been in Pine Canyon in some time, so I used it as my entrance. I parked at the drill hole at the end of the road and was in the canyon in no time. It’s a fairly easy walk all around- across the mesa, the climb in, and the walk down to Grand Gulch. I found the canyon very different from the previous trip about 7 weeks before. During our April backpack the canyon bottom was filled with water; we were faced with skirting around pools and hopping across water running down Grand Gulch. This trip, water was barely visible in the bottom of Grand Gulch. There were a few green, debris covered pools here and there that were of course drinkable, but it was like night and day compared with two months before. The weather was warming at this point, and the heat and lack of water ensured that I was the only one in the canyon- I didn’t hear or see anyone on this trip.

Ruin in Pine Canyon, southern utah. Photo by Gerald Trainor.

Round ruin in Pine Canyon with very interesting architectural change in structure- due to available materials or aesthetics? Note vertical slabs down low, with regular, coursed masonry above.

I could go on as always, but will save it for another post. Next up- more on our new inReach SE, rock art in a boulder field, and parallel stone alignments leading the way to Spirit Bird Cave. For more on our desert adventures, gear reviews, and our archaeological endeavors, visit the Desert Explorer website.


The DeLorme inReach SE Replaces Our SPOT Messenger

30 April 2016

For many years we have been fans of the SPOT messenger. It is a rugged, lightweight, and simple device that for the most part operates just as the manufacturer claims it will. There were definitely tight spots- meaning high and close canyon walls- that inhibited our ability to send messages on more than one occasion. But I think this will be the case for any satellite communication device- they must have a clear view of the sky to operate.

We have been happy with our SPOT. However, we recently received an email from SPOT that stated our subscription option was no longer available and that our annual cost was increasing by $50. There was the addition of the tracking feature with the new cost, meaning the SPOT would send a message every so often as we traveled along the trail in the same way it sends one of our preset messages. This was definitely not something we would use. It was enough to prompt me to look into other devices, and it was easy to find unlimited information on the options. If you search for “personal locators” or “satellite locators” your search will likely return the DeLorme inReach, the SPOT Messenger, and one of the ACR devices.

Since we weren’t in the market for an actual personal locator beacon (the ACR devices), we focused on the DeLorme products and found our replacement in the DeLorme inReach SE. This satellite communicator has all the features of the SPOT Messenger including preset messages (SPOT has 2, inReach has 3), a tracking option, and of course SOS mode. But it goes many steps further- it will link to your smart phone, you can send and receive text messages (to phone numbers or email addresses), it has a GPS function that allows you to see your exact grid coordinates, and the Iridium satellite network that it operates on is a step up from the Globalstar network that SPOT operates on. With Iridium you have truly global coverage with the inReach, and potentially more accuracy, speed, and better chances for getting messages out.

A Few Points of Comparison
There are really so many features on the inReach that it would take a while to cover them all, so I will point out the features important to me. The DeLorme inReach SE will cost $300, while the SPOT Gen3 will cost $150. (Note that there is also the inReach Explorer, priced at about $380, that has even more features.) My perspective is that the additional features of the inReach SE make up for the additional cost. While I won’t use most of the features, the GPS and the ability to send a text saying I am staying out a couple of more nights is worth the extra investment. There are also sounds that can be associated with the various functions, just like with a smart phone. There is a convenient “send” noise that I decided to leave in place; it is helpful to know when the message has sent so I can turn the unit off and conserve battery life.

DeLorme inReach Se and SPOT Messenger. Photo by Gerald Trainor.

The DeLorme inReach Se on the left, and the SPOT Messenger Gen2 on the right. The inReach is definitely larger, and a bit heavier. But the additional features and plan options make it worth it.

The inReach weighs just over 8 ounces, the SPOT just over 4.  The inReach is larger than the SPOT, but not by much. The inReach features rechargeable lithium batteries with a 100 hour life expectancy. It can be recharged via USB or a standard power outlet. The SPOT uses 4 AAA rechargeable NiMH batteries or 4 AAA disposable lithium batteries- a plus in my opinion as you will be sure that the unit can operate without having to find an outlet to recharge it.  The SPOT can also be connected to a USB power source.

Operating costs, and associated features,  vary for the inReach. There are too many options to explain them, so the chart from their website is included below. It must be noted that the inReach has an “as needed” cost option- their Freedom Plan. This means that if you need it for the summer, you pay just for the summer months, then turn your subscription off in the meantime. No data or settings are lost when you turn it off. Turning the service on and off is as simple as logging in to your online account, and following the prompts. Of course there is an annual cost for that option, but in the long run it can easily work out to savings if you are a part-time user. The SPOT cost is about $150 per year, with very few options available on top of that, mainly enhanced tracking. This simply means that instead of a tracking point being sent out every 10 minutes for example, you can choose when it goes out.

DeLorme inReach plan options.

DeLorme inReach plan options.

In the long run, if you are looking for a means to send an SOS if it ever came to it, both devices are good options, although as noted above the satellite system is better with the inReach. If you want features- texts, GPS,  sounds, and a Bluetooth link to your smart phone, then the inReach is for you. You can see the DeLorme inReach SE at Amazon.com. The SPOT Messenger Gen3 is also available at Amazon. You can read more about our desert adventures, the gear we use, and more at the Desert Explorer website.


Another Spring Break in Canyon Country

21 April 2016

We have just returned from southern Utah once again. It was a late spring break for us, but well worth waiting for April to make the trip. The weather was perfect right up till the end, when we caught a bit of the storm that brought winter back to Colorado. We spent our two weeks in the usual places, revisited some of our favorite canyons, and explored some new ones. We made it a point to include plenty of time enjoying sunrises, sunsets, and the star filled night sky, and more than a few afternoons sitting on the slickrock with a cup of tea.

Blooming holly. Photo by Gerald Trainor.

Holly in bloom. The desert was alive with color and fragrance.

Our itinerary brought us straight to southern San Juan county this time. We made an afternoon stop in Moab for final supplies as always, but the weather was so perfect that Moab was too busy for us. April is the perfect time of year for most people- warm days and not too cool nights, without the extreme heat that comes in another month or so. Besides ATV’s and other off-road vehicles, there were mountain bikes everywhere, and more RV’s and camp trailers to be found around every corner than I have ever seen. This was the case everywhere we went- down every road whether it be along Comb Ridge, on Cedar Mesa, or around Green River, where we finished up our trip.

Grand Gulch
We did get a few days of backpacking in this trip. We walked in through Dripping Canyon, had a day in Grand Gulch, and walked out Step Canyon. This is something I have done before, so knew the walk quite well. It was perfect for Nicolai and I- nothing an 11-year-old couldn’t handle. As always, we could have used a couple more days in this short stretch of the canyons- there was just so much to see that we had to choose where to spend our time. For anyone venturing in any time soon, water was not a problem. At least finding drinking water that is. From another perspective, that of walking, it was quite a problem in places. There was so much water in the canyons that we found ourselves skirting pools all along the walk, and especially in Grand Gulch.

Yellow ancestral puebloan pictograph in Grand Gulch, Utah. Photo by Gerald Trainor.

“Yellow Man” panel in Grand Gulch.

Cedar Mesa was a busy place. The Kane Gulch ranger station was packed on the few occasions we stopped in. But once we got in the canyons we only saw, and heard, one group of people. I should say heard more than saw them. Their presence was known to us by their extremely loud voices, yelling I would call it, and their crashing wildly through the brush. We made it a point to discuss this problem with the folks at the ranger station after our walk- noise pollution is  a problem everywhere and especially in such a place as this. I feel that these days so many people don’t know the difference between a place that is… sacred, and say, the grocery store. The analogy I like to use is that I would not come bounding and crashing and yelling into your church, so please don’t come into mine that way. But I suppose, to continue the analogy, I am preaching to the choir here.

Comb Ridge
We have a favorite camp in view of Comb Ridge making it easy to get into the canyons there. We spent five nights on the slickrock at that camp, really enjoying the night sky. I have to make a plug here for one of my more recent equipment purchases. I have been sleeping better than ever these days on an Exped SynMat 7 Sleeping Pad. This inflatable sleeping pad has an integral pump which inflates it in just a couple of minutes. No blowing it up by mouth involved! I have the synthetic fill version which is rated at an insulation value of 4.9, but there is a higher rated pad that has down filling.  I use it at the truck and on the river- it’s just too heavy for me to carry on a backpack. The pads are not cheap, but if you are struggling with getting a good night’s sleep on a thinner pad, you may want to give one a try.

We spent a couple of days exploring Comb Ridge, and as always found more ruins and rock art, middens and moki steps, sweat lodges and seasonal campsites. Comb Ridge is truly a place where one can learn about the varied archaeology of the Northern San Juan region all in one place. One ruin we visited stood out in the amount of mud that was plastered on the walls. The ruin lacked for stone, but still held together well with mud. Looking at it you could see the way it was applied, in great masses, each appearing to be left to sag and dry before the next mass was applied. The interior of the walls had niches built-in, and the end walls were curiously rounded, as if they were not continued across the front, but were left open.

Ancestral Puebloan structure in Comb Ridge, Utah. Photo by Gerald Trainor

Comb Ridge ruin with walls lacking in stone but showing an abundance of mud.

Ancestral Puebloan dwelling in Comb Ridge, Utah. Photo by Gerald Trainor.

End wall of plastered ruin showing rounded finish. Note the thick mortar beds between the thin pieces of sandstone.

There is always so much to see, and to write about afterwards, on our Utah trips. But for now it’s back to preparation for the next trip. In about a month we are back in southern Utah for more archaeology at Nancy Patterson Village. For more about us and our desert adventures visit the Desert Explorer website.


This Way Down, and An Update From Moab

20 March 2016

We have been spending a lot of time in Comb Ridge in recent years, stopping in for a few hikes on nearly every trip. We have been in many of the drainages along the southern end, starting at the highway. But there are many more summer’s worth of hikes towards the north. One specific goal this summer is to find at least one of the crossovers into Comb Wash from the Butler Wash side. I understand that there are a couple of them. And I have a suspicion that we may have been in one of the drainages that leads to the other side. A few summers back we here high up one of the canyons, walking up canyon, when we found a small petroglyph panel that had a large ladder-looking inscription. To me it looked just like a kiva ladder. Did the ladder signify to travelers that they could climb down the other side if the followed this particular drainage? This is a question I would like to answer, to see if this was an ancient signpost saying “this way down”.

Kia ladder petro. Image by Gerald Trainor.

Kiva ladder petroglyph from a canyon along Comb Ridge. Scale at right of image is 10 cm.

Update From Moab
We were in Moab in January when news broke about the closing of another missing person case. On the evening of 19 November, back in 2010, Ranger Brody Young was checking on a car parked at the Poison Spider trailhead. The person in the car opened fire on him, hitting him nine times. Range Brody returned fire and apparently hit the suspect as he fled. The suspect’s car was found within a few miles, but he was not found. A manhunt ensued, but was unsuccessful in locating the suspect. Now, five years later, the body of Lance Arellano has been located. A college student home for the Christmas holiday and his younger brother did a systematic search of the area where the suspect was last known to be, and found his remains.  The brothers will split the $30,000 reward. You can read more about the incident on the Moab Times website.

You can read my original blog post and subsequent updates at the Desert Explorer Blog. For more on the 1998 Four Corners Manhunt or all of our desert adventures, visit the Desert Explorer website.